Step By Step On How To Create A Profitable Dropshipping Store Through Shopify (Part 1)
Am Very Happy For Having You Here As You're Taking A Step To The Successful Way Of Making Money Through Dropshipping From Shopify.
If you are convinced about Shopify don’t waste more time and Sign Up Now and start building your online store following this article!
First of all, this article is dedicated for those who are serious about creating an online store and those who want to start selling as soon as possible. We will be covering step by step how to set up your first Shopify store!
- Take action now and Sign up!
- Choose a Shopify Plan
- Get a Domain on Name Cheap and SSL Certificate
- Understand Shopify’s Dashboard
- Edit Store Settings: Payment Gateways, Shipping rates,
- Get a Theme
- Add Products
- Add Apps
- Set Up Analytics from Shopify and Google
I’ll show you recommendations and all the steps to set up your online store in a few hours.
Take Action! Sign Up and Set Up Your Shopify Store Now!
The first step of all is to Sign Up Now and start right away! But before beginning, you must have the following:
In order to avoid a bottleneck setting up your store, before you begin you must have the following:
- The name of your store. It should match with your actual domain if you have one. You can add your own domain but it is also required a store name to sign up. If you want to look professional, you should have your own domain.
- A Password.
- Money and Time to Invest: Be aware that opening an online store as all businesses require time and investment, Shopify works as a monthly subscription that also charges you for transaction fees depending on the payments you receive. You’ll be charged a flat rate and the sum of all the transaction fees of all your sales of the past month.
Take in count that one you sign up your store it will make the set up faster if you have the following:
- An Email Account. It will be shown in every email and notification sent to your customers. It should match with your own domain as well. We will cover that section below.
- Your products price list and pictures ready to post. If you have variants of your product also add the prices and pictures of the different variations.
If you are in, then the next step is choosing the right plan for you. Shopify allows you to start building your store during a free 14-day trial before paying, but during this period you cannot sell because your store will we blocked unless you pick a plan.
Step 1: Sign Up!
You’ll be shown the registration form like below. Remember to have your store name, your email address and password.

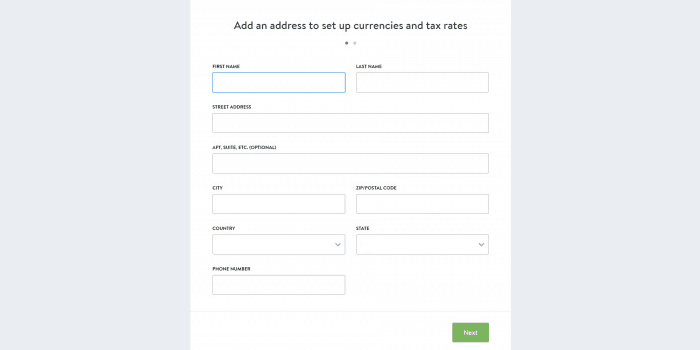
Then, you must fill your account information by location to set up the main currency, tax rates and available payment gateways.
Step 2: Pick a Plan
These are the current Shopify Plans and Pricing:
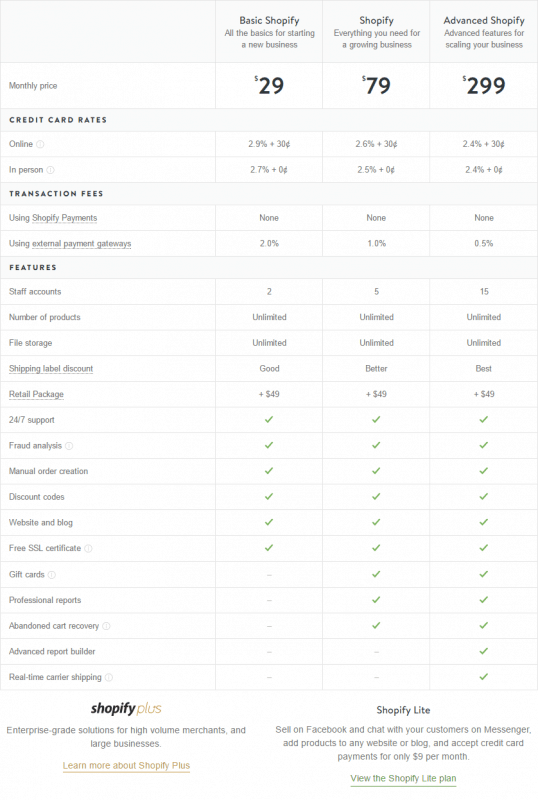
Shopify offers different plans according to your needs. For beginners, I highly recommend to use the Basic Plan. Why? Because If you look at the different plan features you can see that the “Basic Shopify” plan offers all you need to set up your store and start selling as soon as you drive traffic to your store. The main difference between plans is the transaction fee rates. There are some features this plan doesn’t include like “Gift Cards“, “Professional Reports“, “Abandoned Cart Recovery“, etc. To be honest, these features are useless unless you have a good amount of sales from the beginning because only that way you can take advantage of it. For example, the professional reports only matter if you get information of a large number of orders, not just a few. It also applies to the other features.
If your store is doing well, let’s say you are hitting 200 orders a day, you might consider upgrading to the next plan in order to get those extra features. The “Abandoned Cart Recovery” is one of the most useful tools to increase sales if you have a good amount of traffic. If you are choosing the “Basic Shopify” plan, you can add this function with a free or paid app from the Shopify App Store.
There is a cheaper plan called “Shopify Lite“, it is actually only a Buy Button that you add to your own website, it also lets you sell directly on Facebook. As it is the cheapest plan, it is also the most limited and I don’t recommend it if you are serious about selling online.
In conclusion, take your time to analyze your statistics and measure your results after a month and then upgrade if necessary.
Step 3: Get a Domain for your Store
If you buy a custom domain from a third-party provider like Namecheap, you must reconfigure your DNS settings to point the domain at your Shopify-hosted storefront. Let’s cover all the process from the beginning:
- Go to Name Cheap and Get a Domain.
- Search a Domain for your Shopify Store. Use the search field to find your desired name or alternatives if it is already taken.
- Once you chose a domain, add it to your cart by clicking on the shopping cart icon button located at the right of every domain name.
- Click on “View Cart” to visualize your order.
- Click on “Confirm Order“.
- Sign Up. You’ll be asked to log in or create an account if you haven’t already.
- Log in to your Namecheap account.
- You’ll be shown your current domains. Click on “Manage” which is located at the right of the domain name.
You need to set up your root domain by editing your DNS settings and pointing your “A Record” to Shopify’s IP Adress which is:23.227.38.32. - Click on the tab “Advanced DNS“.
- Click on “Add New Record”
- Select “A Record” from the drop-down menu and enter Shopify’s IP address 23.227.38.32 in the text field.
- Save Changes by clicking on the check mark icon at the right.
- To set up your sub-domains, click again on “Add New Record” and select “CName Record“.
- Enter your Shopify store domain in the text field. e.g. storename.myshopify.com
- Save Changes by clicking on the check mark icon at the right.
Once your domain is added to Shopify correctly it’s time to activate the SSL Certificate of your store:
- Go to “Online Store“
- Click on “Domains“
- In the SSL Certificates section, click on “Activate SSL Certificates“. (Blue Button)
- You’ll be shown a confirmation box.
Your store now has an encrypted secure connection to take transactions online!
Step 4: Understand the Dashboard
Take time to identify the location of the different menus and features. It is easy, you have a sidebar on the left where you have all the menus. In this sidebar, you have one main menu and four of the list (“Orders, Products, Online Store and Settings“) have expanded sub-menus. When you open one of this four sub-menus the main menu will show only the menu icons. To get back to the main menu just click on the menu icon you want to get in. You’ll find everything you need to manage your store in this sidebar.
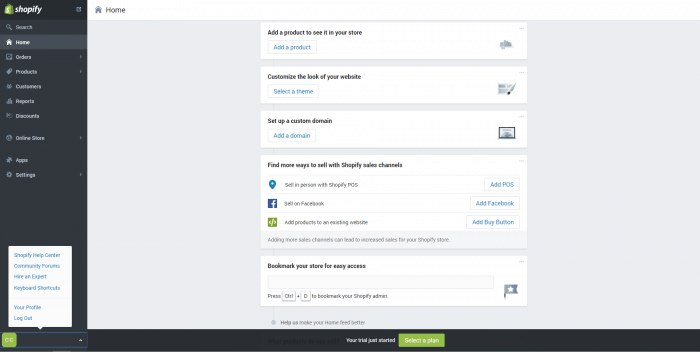
At the bottom of the left sidebar, you’ll find another menu, less useful, where you find a shortcut to your “Shopify Profile” and “Log Out“.
Step 5. Customize Settings of Your New Store
First of all, you must customize the settings of your store before digging in the theme deign. This should be a fast process and if you miss some information leave that setting for later.
Start with the Settings Menu
- Go to “Settings” –> “General“
Some of these settings are already filled with the information you provided in the registration form, here you can edit everything and fill the missing fields. - Go to “Settings” –> “Payments“
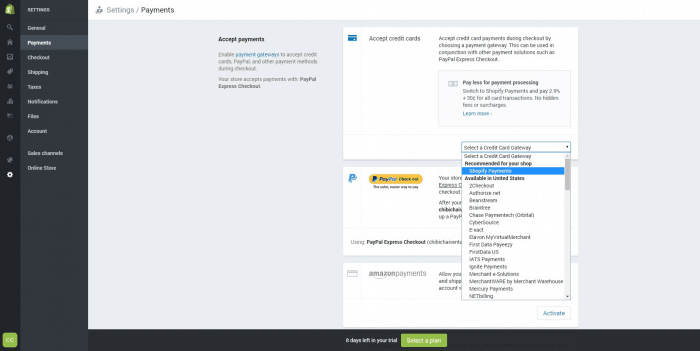
Here you’ll find the payment gateway options available depending on your location. One of the best options is “Shopify Payments” because it doesn’t charge transaction fees. “PayPal” is also a great option to add for your customers. - Go to “Settings” –> “Checkout“
In this section, you’ll find settings about the Checkout process like choosing if your customers need to register in order to checkout, select the optional and required information in the form fields of your customer’s information.In this section at the bottom is where you find the fields to write the Refund Policy, Privacy Policy and Terms of Service that will be shown in your store. This is important to fill in order to inform your customers about the refund policy and to show that you are serious and professional.
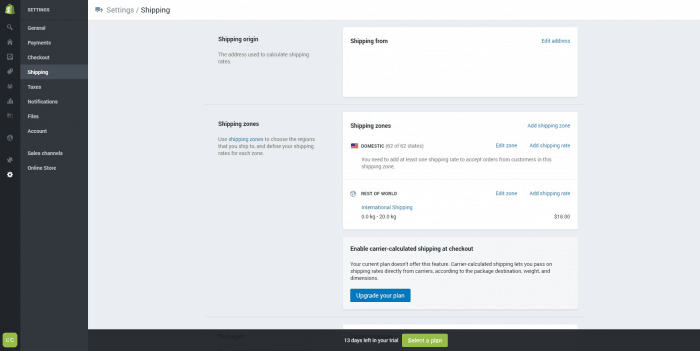
- Go to “Settings” –> “Shipping“
In this section you set the shipping rates depending on the costs you get from shipping companies like DHL, UPS, FedEx, etc. Shopify doesn’t manage the shipping, you must have an account with one of these shipping companies and set your own shipping rates and zones. There are some useful Shopify Apps that help you to manage more efficiently this part of the process. - Go to “Settings” –> “Taxes“
In this menu, you’ll find the taxes section that only applies to stores in the United States. Here you can choose to add taxes on checkout or you can include it in your prices. - Go to “Settings” –> “Notifications“
In this menu, you’ll find all the standard notification templates that are sent to your customers. All these are customizable notifications and you can send test emails to your own email to see how it looks. There is a general customization of email notifications that you can edit clicking on the button “Customize”. Here you can add your logo or change the color of the buttons and links.If you want to edit every single email notification, I recommend leaving this section to the end since the main purpose is to set up your store and start testing and selling.
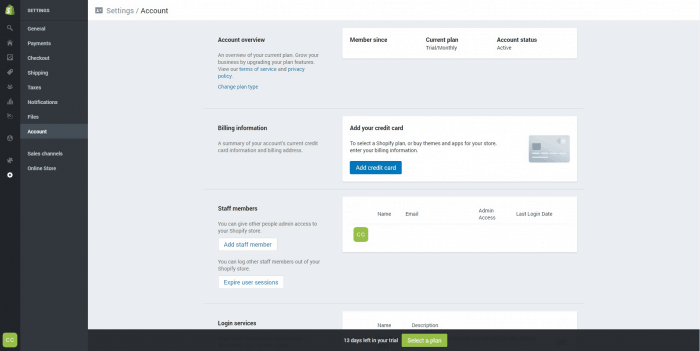
- Go to “Settings” –> “Account“
Here you can edit your Shopify plan, payment method and billing information. Here you can also you can add staff members to let them log in and manage your store. - Go to “Settings” –> “Sales Channels“
In this section, you’ll find different sales channels available. One of the most popular is the integrated shop on your Facebook Fanpage. By adding this, your products will be added in a special tab shown on your Fanpage and your fans can actually buy from there.And the last “Settings” sub-menu is called Online-Store. Notice there is also another menu located in the main menu with the same name. Both are completely different.
Step 6: Get a Theme for Your Store
- Go to “Online Store” –> “Overview“
Click on “Select a Free Theme”. You can choose one of the themes shown by clicking on it, it will show you a preview if the theme and you can choose to apply this particular theme to your store by clicking on “Publish Theme” or you can choose “View Demo” to see how it looks like a real store with products.Also, you can click on “Visit Theme Store” at the top right to see all the free and premium themes sorted by niche and popularity. You can pick a theme from the Theme Store by clicking on the desired theme and then click on the green button “Install Theme”.
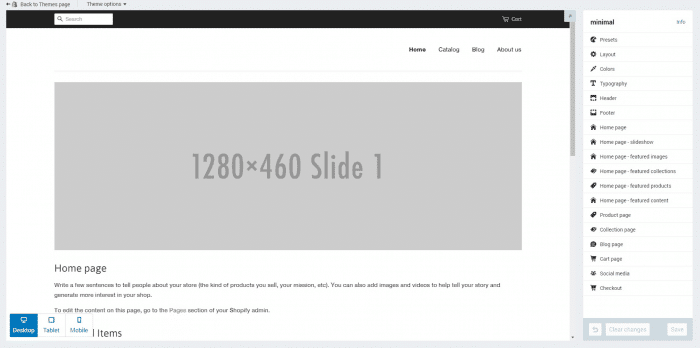
Once you have chosen a theme, you’ll be automatically placed in the “Themes” section on the Online Store sub-menu. In this section, you’ll find the following page and if you want to customize your theme again, click on the blue button “Customize Theme”. In this part, you’ll find every design option to customize your store. Now, the settings are placed on the right sidebar.
You can preview all the settings before saving and you can actually clear the settings with the blue buttons at the bottom of the sidebar. Also, you can see the preview of your store in Desktop, Tablet and Mobile preview by clicking on the icons placed at the bottom left. There is a drop-down menu at the top where you can edit the language of your store and HTML/CSS. Finally, at the right top, you’ll find the shortcut to go back to the dashboard by clicking on “Back to Themes Page”. - Go to “Online Store” –> “Blog Posts” Here you can add posts to your store that will be shown in your “Blog” Page.
- Go to “Online Store” –> “Pages” If you need to add more specific pages to your store such as a contact form you can add it here.
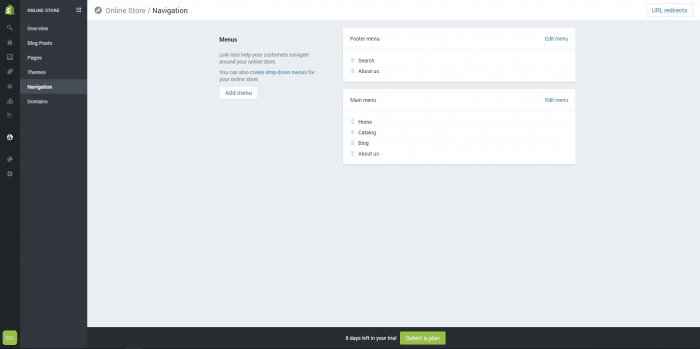
- Go to “Online Store” –> “Navigation” In this section, you find your menus: Main Menu and Footer Menu. You can drag your pages to change the order as it is shown in your store. You can also select specific pages, products and links for a specific page. Here you can also add other menus.
- Go to “Online Store” –> “Domains”
In this section, you can add your own domain.
Finally, after editing your settings and your theme design, you need to add your products in order to complete your storefront.
Step 7: Add Your Products
- Go to “Products” –> Click on “Add Product”
You’ll find that you have everything you need to describe your product and organize your inventory.
As mentioned in our recent article where we talk about Shopify Empires – The process behind $100,000+ per month e-Commerce Stores we feature Oberlo, an app that imports automatically products with its images, variants and description to sell drop shipped products. It is the fastest way to import products from Aliexpress.
In the sidebar you find very useful functions, with “Visibility” you can leave your product published or unpublished while editing.

The organization fields like “Product Type” and “Vendor” let you identify your products. The “Collections” field is important because it is the same as categories. This will group your products in different collections/categories. You can manage your collections in the “Collections” Sub-menu. e.g. Go to “Product” -> “Collections”
One of the best functions of Shopify is that you can add lots of variants to one single product. You can also change the price of each variant and add a different picture to the variant if needed. You can edit, add and reorder the variants if needed. Also, you are able to add SKU and barcode.
If you have similar products, you can duplicate your products to add it as fast as possible. You’ll find the “Duplicate” button at the right top of a product page.
Step 8: Add Apps
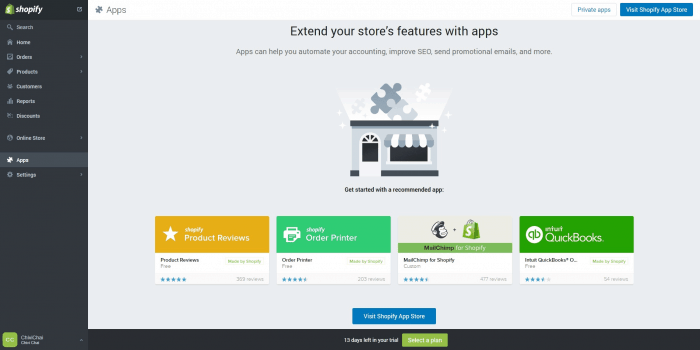
- Go to “Apps” (At the bottom left). You’ll be shown the Apps manager where you can edit and delete apps on your store.
- Open the App Store. At the bottom, you can find the shortcut to the App Store by clicking on “Visit Shopify App Store“.
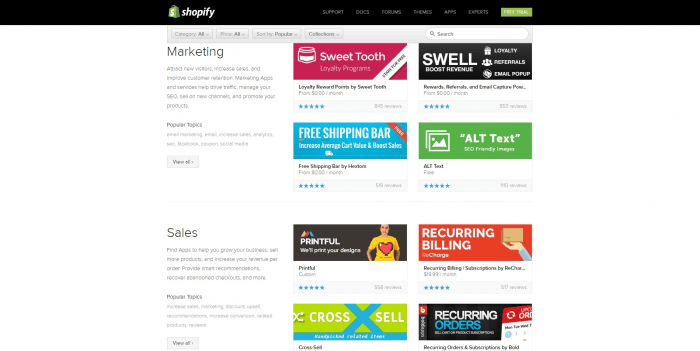
- Add an App. Apps are added only from the App Store. Search for the desired app using the Search field or you can actually search by Category, Price, Popularity, Collections, etc. Click on the desired app icon and you’ll be shown the app page. Click on “Get” (Green button) and you’ll be redirected to your Shopify manager asking you to install the app. Click on “Install App” (Blue button). Once you added the app you’ll be able to get in the app dashboard to edit settings by clicking directly on the app name. IMG
Step 9: Analytics
Shopify includes basic reports in the “Basic Shopify” plan and “Professional Reports” in the “Shopify” plan, while the “Advanced Report Builder” is only available in its “Advanced Shopify” plan.
- Basic Reports include “Finances Reports” along with the “Store Dashboard” available in “Shopify Lite” and “Basic Shopify” plans.
- Professional Reports include “Sales Reports“, “Customer Reports“, “Acquisition Reports” and “Behavior Reports” available in “Shopify” plan.
- The “Advanced Report Builder” includes “Custom Reports” available only in “Shopify Advanced” and “Shopify Plus“.
To see your reports, no matter which plan you got:
- Go to “Reports“
- Select “Reports” to watch a general overview of your business sales and access different types of reports from there if you have “Professional Reports” or “Custom Reports“. Here you can create customized reports based on different filters such as: “Products“, “Traffic Sources“, “Customers“, “Referrals“, etc.
- Select “Dashboards” to view in-depth report activity such as “Total Sales“, “Visitors“, “Conversions“, “Top Products“, etc.
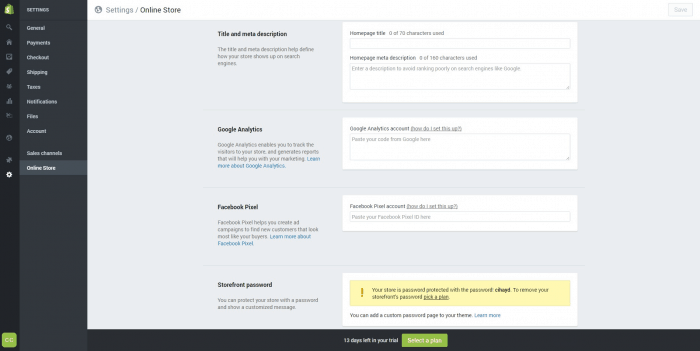
Shopify supports Google Analytics in order to track your visitors and get very useful and valuable information. If you are serious about selling you have to add this to your Shopify store.
- Go to “Online Store” –> “Preferences“
To make it work, it implicates more than just adding your Google Analytics Account number on the text field. Check this complete guide provided by Shopify before you begin, and follow the correct process to add Google Analytics to your Shopify store.
The final touches…
Once you completed all these steps your store should be almost finished and ready to sell. It’s time to check and test every step of the purchase process to verify that all the functions are working correctly. Buy something from your store to see if the purchase process actually works.
Once your store is finished you are ready to drive traffic to your Shopify Store! Don’t miss our upcoming article to learn how to launch your first Facebook ad campaign for your Shopify Store.


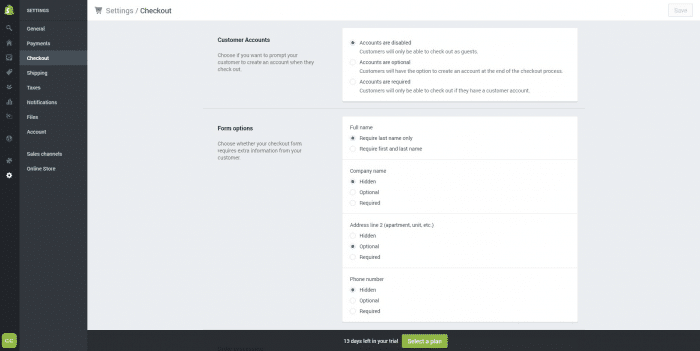 In this section at the bottom is where you find the fields to write the Refund Policy, Privacy Policy and Terms of Service that will be shown in your store. This is important to fill in order to inform your customers about the refund policy and to show that you are serious and professional.

 If you want to edit every single email notification, I recommend leaving this section to the end since the main purpose is to set up your store and start testing and selling.
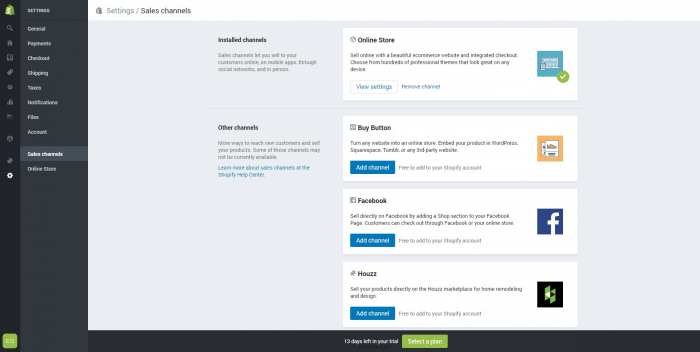 And the last “Settings” sub-menu is called Online-Store. Notice there is also another menu located in the main menu with the same name. Both are completely different.
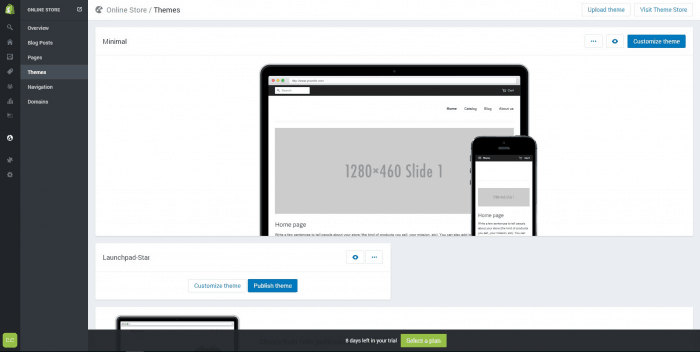 Also, you can click on “Visit Theme Store” at the top right to see all the free and premium themes sorted by niche and popularity. You can pick a theme from the Theme Store by clicking on the desired theme and then click on the green button “Install Theme”.
 Once you have chosen a theme, you’ll be automatically placed in the “Themes” section on the Online Store sub-menu. In this section, you’ll find the following page and if you want to customize your theme again, click on the blue button “Customize Theme”. In this part, you’ll find every design option to customize your store. Now, the settings are placed on the right sidebar.



You have done a wonderful job. I also want to address If you are new, I advise you to consult professionals who will make you a site or allow you to choose a template for your site in the category here shopify wordpress theme
ReplyDelete